
The Instant Film Society
March 11, 2013 § Leave a comment

As a handful of you probably know, I’ve been dedicating a lot of my time lately to promoting the use of instant film throughout the community here in Texas. The past 6 months have included a whirl-wind of activity that, for the most part, has been centered around instant film. I haven’t been posting as much on this blog. Many of the posts and educational material has been posted on The Instant Film Society‘s website.
Please take some time to check out our new website. From this point on, the instant film centric posts will be updated on our new website and I will occasionally post material that’s non-instant film related here.
Thanks for keeping in touch and taking the time to read the material I write. I appreciate you.
-Justin
A Time-Lapse Video from our PolaWalk in Deep Ellum with the Instant Film Society
February 4, 2013 § 1 Comment
A little over a week ago, we hosted our monthly PolaWalk with the Instant Film Society, this time in Deep Ellum. Steve Reeves, of Makeshift Photography, who was kind enough to let us use his studio for this particular get-together, set up his camera above the studio, snapped thousands of images during the 7+ hours we were there and created this really cool time-lapse video afterwards showcasing the event.
If you’d like to see more images from our PolaWalk, click here or check out this article the Dallas Observer posted.
Enjoy!
PS – Thanks so much for taking the time to create this Steve.
-Justin
Visiting the legendary 20×24 Studio in New York City
January 30, 2013 § 7 Comments
Earlier this month, I had the opportunity to stop by the 20×24 Studio in New York to visit with John Reuter & Nafis Azad. As many of you might know, I’m a HUGE advocate of instant photography and promote its use as often as I can through the Instant Film Society. My wife and I were visiting New York for my birthday and besides visiting The Impossible Project gallery space, visiting the 20×24 Studio was something that I really was looking forward to.

A peak inside 20×24 Studio – Leica M2 – 15mm Voigtlander – Kodak Ektar
Before my meeting on Friday with 20×24, I had swung by The Impossible Project to meet Dr. Florian Kaps that morning, who on the off chance just happened to be in town. While visiting TIP’s studio space the day before, Anne, the US marketing director, had mentioned that he was in NYC for a few days and told me if I swung back on Friday, I could meet him. I wasn’t going to pass up that chance. I’m grateful for the opportunity (thank you Anne) and it was really cool spending a few minutes with him talking about what I’ve been doing in Texas to promote instant film.
The meeting with John was scheduled for Friday afternoon. Synthia and I made our way over to Murray St. from the Flatiron District on a brisk New York winter’s day following a meet up we had with Rommel Pecson (incredible photographer and a hell of a nice guy). Upon our arrival, I called John, left him a message and we waited. A friendly gentleman poked his head out of the door “Are you waiting for someone?” “Yes. We’re just waiting for John. Is he here by chance?” He opened the door for us and smiled. “He’s not here at the moment, but you’re more than welcome to wait in the lobby. It’s warmer in here than it is out there.”
After a few minutes, John, the Executive Director at 20×24 since 1980, and Nafis, the Director of Photography at 20×24, came racing through the door, walked right past us and quickly made their way up a staircase that was adjacent to the lobby. Synthia looked at me and waved her hands towards the stairs in a go-after-them motion. I shook my head and whispered, “I’m just going to be patient. He’ll return my call soon enough.” I waited a few minutes and with a you-better-call-him-again-look, Synthia convinced me to call John back. After a couple of rings, he answered the phone “John, this is Justin .. “ He quickly replied “Oh no! Did we walk right past you downstairs? I’m so sorry!” I chuckled “It’s OK! It’s no biggie ..”
The elevator door opened a few seconds later and we made our way up to the third floor. When we opened the door to the studio, I stepped into a place that I was literally dreaming about the night before. The first thing I noticed was of course the legendary 20×24 Polaroid camera. I was completely stunned. I quickly gained my composure, walked over to Nafis, introduced ourselves and immediately thanked him for their time today. John, who was busy working on his laptop, stood up quickly and walked over to us to shake our hands. The phone rang. Nafis answered it and John was fast at work back on the phone booking a shoot. Nafis and I talked for a little while about photography and how each of us had begun on this life-long journey. I love this type of banter between professionals. You can quickly gauge what type of person you’re dealing with when you talk with one another about your own passion for photography. Some photographers puff their chests up and start bragging. Both Nafis & John really did none of that. They were very down to earth and had their feet planted firmly on the ground … I tip my hat to them.
We spent a good amount of time at the studio. I asked John a variety of questions concerning the history of the camera, what developments were in the works for new instant film and many other things. I recorded about 30 minutes of my conversation and I’ve culled it down to what I feel are the most important details of our visit.
Enjoy …

Polaroid 20×24 Camera
Can you give me a brief history of the 20×24 camera?
In the middle of the 1970’s, Polaroid was getting ready to produce color film for 8×10 cameras. They had only made 4×5 film up until then. The film was always made on a very large web. The negative was 60 inches and the positive was 44. It wasn’t like they had to manufacture the film for something like this to happen. Dr. Land, being the showman that he always was, wanted to do a big thing at an upcoming shareholder’s meeting. He was, sort of like the prototype of Steve Jobs, in terms of big splash demos. He told his research people, what if we could create a picture that was 20×24. The way they got to 20×24, was that there was a process camera in one of the labs and they actually rigged a Polaroid back to go onto it. The maximum size of that was 20×24. That’s were 20×24 came from. They could have easily done 24×30, a more traditional photographic size, but 20×24 it was. They also, at the same time, went ahead and built a 40×80 camera. For the shareholder’s meeting, they showcased copies of paintings that were done for the museum of fine arts, and had portrait demos; Andy Warhol did a portrait from the stage, Marie Cosindas photographed Candice Bergman. The camera was a big hit. Edwin Land decided that Polaroid would commission their own woodworking and metal shops to produce 5 of these cameras, which they did over 1977-78. They opened a studio first in Cambridge, on company property at Ames St. near MIT, and they started inviting artists and photographers to come in to use it. That began the artist core program based around 20×24. There had always been fairly active programs supporting the smaller formats. It started in the 60’s and was in its zenith in the late 1970’s. Eventually they hoped that it would start to pay for itself, because it’s a very expensive process even when it was just used for promotion. Polaroid started doing market research and brought the camera down to New York in 1980 for three months, reaching out to art directors & professional photographers at a temporary space off of Broadway and 29th St. After three months, Polaroid brought the camera back to Massachusetts. I was at the Museum School in Boston for 3 or 4 years, and we primarily had the artist program as the major part of it. Some commercial jobs started rolling in, and we started to come down to New York a lot more. A week here .. a week there. Finally in 1986, we decided to move down full-time, which we did at Broadway and Prince Street. Polaroid continued their artist program, slowly but surely, the studio became more and more commercial. In fact a lot of our supported artists became our customers, because they started to become successful with the work. They had museum shows or got editorial jobs. We actually did a surprising amount of advertising work in the 80’s and early 90’s. And then of course, Polaroid’s troubles started. We knew as early as 2004, that Polaroid was getting out of the film business, although we couldn’t tell anybody then cause they didn’t want the customers to know. They were worried that if they found out, they would stop buying the film. And what happened was just the opposite. When they finally did tell everybody that they were getting out of the film business, people rushed in to buy it. What they set aside, they projected out that it would last X number of years, it was taken in a quarter of the time. They had no ability at that point to make more. They had stopped the chemical process first. Because Polaroid was licensed and permitted for all these very hefty chemicals, they made a lot of their own chemicals. Once that stopped and they had canceled these things, there was no going back. You’d have to reapply for permits and who knows if they would have gotten them. They did terminal runs of film in 2006 of all the sheet positive for all of their films and sold them all in 2008. We moved here in the summer of 2008 and we’ve been here since.
How much film do you have?
We have about 27,000 meters of 22 inch rolls. That’s a lot. More than we can use in about 10 years and it’s not going to last 10 years so we have to do something. My hope is that getting smaller formats (8×10 and possibly 4×5) out into the marketplace will prompt us, if the demand is good, to be able to make new film. I think that pent up demand should be good.
Have you created a new reagent for your films?
We are going to create a new one for our black and white film. Some of the chemicals that are needed are harmful. This is what happened to Impossible. The European Union has stricter environmental laws than the US does. Some of the chemicals that were grandfathered in to the early Polaroid films are no longer legal. They can’t use some of those materials and that’s the case with a couple of things that we use. But the other problem is, that’s almost equally as bad, is that Polaroid used to sometimes make some of this stuff themselves or would buy from vendors who had a huge minimum buy. For instance, they’d have to buy $100,000 worth of one compound. It was never a problem for Polaroid, because they sold millions of dollars worth of film. It’s economically prohibitive to use certain things. But B&W is kind of simple. It’s just a more elaborate form of traditional black and white reagent.
How does the transfer process work between the negative & the positive after developer paste has been smeared in between?
When it’s exposed, if you make a comparison to conventional photography, you expose an image, let’s say that B&W portrait for instance (John pointed towards a newly shot B&W image tacked up on the wall), and you have the whites and you have the blacks. When you develop that up, in conventional and then you fix it, you reduce what was not used. So, the areas that would be black or dark gray, don’t develop out. They just sit there and when you fix it, they go away and the film becomes clear and it prints black. What happens with instant, is instead of being reduced by a fixer, it instead transfers over to the positive. Where you have no exposure, all your black will come over to the positive and give you black. Where you have exposure in the highlights, it will all stay on the negative and not go into the positive. Obviously various tones transfer over and it moves into the gray tones. Rather than being fixed out, reduced and run down the drain, it instead just moves over to another piece of material and you get two products from it, the positive print and the negative.
Who inspires you with the work you do?
I have a much more painterly bent. When I was younger, all my influences were painters. Surrealist painters; Max Ernst and Rene Magritte. Then later expressionists like Francis Bacon. In black & white, I was a big admirer of Jerry Uelsmann and Ralph Gibson. Although more often, influence from the painters really found their way into my work.

“Reticulation” – Digital Tranfser Collage by John Reuter
When I was visiting, I noticed a piece of art that John had created hanging on the wall. One of his collages, which at the time I thought was an analog collage. John explained to me how he created it …
This was a digital collage first done in Photoshop. Back in the 90’s, Polaroid not only had a film scanner, but they also had a film recorder that output RGB tones to film. Almost like a cathode ray tube for TV … it would write back to film. It was an 8000 line recorder (pretty hi-res). I’d get a 4×5 transparency of this collage I created in PS and then I would take that and use some of my Sinar components and turn my camera into an enlarger of sorts. I’d mount the transparency on a piece of milk plexiglass, have an enlarging lens on the standard and the front bellows just fed into the camera. I back lit the transparency with a strobe and set it literally like an enlarger. Then I would print to 20×24 film and then do an image transfer. The transfers I did, I always liked to have them distressed and a little messed up. I would do a huge amount of hand coloring. A lot of retouching dyes, pastel, dye pigment .. which is why they are still here. If they were just straight transfers they would be very light by now. The transfer process never was all that stable. Although, now when people do them, everyone scans them. You can scan a 4×5 transfer and easily blow it up to 11×14, 16×20. So we’ve moved over the years to sort of an analog capture to a digital output philosophy to best take advantage of the medium. I miss doing them. It was a lot of fun to work with the materials that way.
The Camera

Photo courtesy of 20×24 Studio

Photo courtesy of 20×24 Studio

Photo courtesy of 20×24 Studio
When researching the 20×24 Studio online before my trip, I ran across many informative posts on their website. A couple of videos that might interest you; one shot by Inside Analog Photo shows the 20×24 camera in action and the other shows the developer pods being created.
20×24 Studio is currently having 2 additional cameras made for them by Mammoth Camera in California. If you’re interested in this format and would like to have one of your own, click here for future information.
__________________________________________________
What are the specifications of the camera?
The 20×24 camera is a traditional view camera, but has hybrid characteristics of a rail camera and field camera. It weighs 235 pounds and sits on a rectangular frame on wheels that supports a two-column studio stand. The bellows is driven by a telescoping nylon gear that allows bellows extension from 17’’ to 60”. The front standard has 24” of rise and fall, 6” of side to side shift and the ability to swing 4” forward and back. The rear standard of the camera is static and has no independent rise and fall separate from the camera itself. The camera can descend to 24” and rise to a height of 72”. The camera rear box contains a built in processor with 22″ titanium rollers. It is driven by a geared motor drive powered by a 110v AC motor. Transformers are used for 220 or 240v current.
What lenses are used on the 20×24 camera?
The New York Studio offers focal lengths of 1200mm, 800mm, 600mm, 360mm, 210mm, and 135mm. Only the 1200, 800, and 600 were designed for the 20×24 format. Translated into inches these are 48 inch, 31 inch, and 24 inch lenses. The bellows of the camera extends from 17 to 60 inches and each of these lenses will provide different levels of magnification at different bellows extension. The 24 inch lens (600) has the most range of magnification, allowing landscapes at infinity all the way up to 1.5 times lifesize. The shorter focal lengths, which are actually 8×10 and 4×5 lenses provide magnifications from 1.5 times life-size all the way up to 10x. As magnification increases, depth of field decreases and subject to lens distance decreases. At extreme magnification, it becomes more difficult to light the subject, because it is so close and the bellows extension factor can lose up to 8 or 9 stops of light.
How is the film put in the camera?
20×24 film is provided on rolls. The negative is supplied as a 150’ roll and sits on brackets at the top of the camera box. The positive is on a 50’ roll and sits on a similar bracket at the bottom of the processor. There are no sprockets in the film and it is moved into position with tab connected to string with adhesive tape. This simple solution was utilized early on and has never been improved on. Above the positive roll in the camera sits a tray that through a chain driven system moves the chemical reagent pods into position between the two rollers where the negative and positive meet.
__________________________________________________
20×24 Studio Rental in New York
If you’d like to use this camera and rent time at their studio space in New York, the day rate is $1750. The film is $200 a shot (color or B&W). For a limited time through the end of February 2013, their color film is being offered at a discounted price of $125 a shot. When visiting, I was told to budget for two test images. You might think that is incredibly expensive. For some, it probably is. However, if you think about it, you get exclusive access to the most unique analog camera available and you’ll be sharing in the opportunity to create one of kind works of art on a very special medium. After meeting these gentlemen and seeing this thing in person, it is now one my goals in life to one day use it. If you’re reading this are interested in having your portrait taken with this camera, please get in contact with me. I would love for you to be my first …
__________________________________________________

Photo: Synthia Goode – Impossible Project PX-680 CP – SLR680
John Reuter and Nafis Azad are so talented and meeting them on that day was something I will remember for a lifetime.
Thanks again for your time and this opportunity gents. I look forward to the next time we’re in New York City. I will definitely be stopping by to say hello if you’re in town.
-Justin
CLICK HERE to learn more about the 20×24 Studio
A PolaWalk in Deep Ellum / 8×10 Portraits with the Instant Film Society
January 28, 2013 § 4 Comments
This past weekend, The Instant Film Society hosted, what was more than likely, the largest gathering of instant film enthusiasts in the state of Texas. More than fifty photographers and lovers of instant film gathered at Makeshift Photography‘s studio in Deep Ellum to participate in a PolaWalk and also have their portraits taken on Impossible’s 8×10 film.

Photo: Justin Goode – Impossible Project PX-70 COOL
A couple of days before the event, I spent a little time with Steve Reeves, Troy Bradford & Tyler Tyndell at Steve’s studio to get some things organized for this. We met up to talk 8×10 photography, get things set in place for Saturday’s PolaWalk and tested out a few things before we parted ways for the night. While we were there, we decided it would probably be best if we went ahead and knocked out a couple of the portraits before we had the rush of people that we were expecting on Saturday. Tyler took some great BTS photos of our meet up that evening.

Impossible Project 8×10 PQ – Burke & James Grover

Impossible Project 8×10 PQ – Burke & James Grover

Photo: Tyler Tyndell

Photo: Tyler Tyndell

Photo: Tyler Tyndell

Photo: Tyler Tyndell

Photo: Tyler Tyndell – Polaroid 1200 Cinema Film
When I woke up on Saturday morning, I was excited beyond belief. I couldn’t wait to get into the studio to set up for this particular PolaWalk. We’ve hosted quite a few since the Instant Film Society was founded, but nothing up to this point, had been as highly anticipated as this particular event. The lure of 8×10 cameras and large format instant film was creating quite a buzz within the photography community. About two weeks ago, I shot 8×10 instant film for the first time and immediately fell in love with the medium. It’s simply incredible. There’s nothing else like it out there in the market place and it’s quite honestly a rarity in a sense. At this point in time, only one company makes it and because of the high cost of materials & tools needed, most photographers don’t ever get a chance to see it or use it. Giving that opportunity to the D/FW instant community was something I was really looking forward to helping provide.
When Synthia and I got to MakeShift Photography’s studio on the day of the PolaWalk, Steve & Erin were prepping for the event and all of us were eager to get things started. Friends of ours started to trickle into the studio and within an hour or so, we were all gearing up for a busy day. I had split the 8×10 photo shoots up into two groups so it wouldn’t be too incredibly busy while we worked and by the time 3 o’clock rolled around, the studio was packed. Steve had his Toyo View 8×10 set up on one side of the studio utilizing a “blackground” and I was set up on the other side with my Burke & James Grover shooting towards a blank wall. Erin was loading up the 8×10 Polaroid holders and running the processor all afternoon and Synthia was scanning the 8×10’s, peeling the images and hanging them up to dry. It was definitely a group effort to get this whole shabang running quickly & smoothly.
When most of the participants had arrived, Daniel Rodrigue took the first group out to walk around Deep Ellum while the rest of us stuck around to start with 8×10 portraits. It was such a cool thing to be able to give this opportunity to these fellow photographers. I assume most hadn’t seen an 8×10 camera before. Everyone it seemed was just in awe of the process and I could tell were all stoked to have the chance to learn about this special way of creating images.
All in all, I think we ended up taking about 25+ 8×10 images and the ones who were photographed were thrilled to have an instant 8×10 portrait of their own. Attached are some of my personal favorites from our time at the studio …

Photo: Tyler Tyndell – Impossible Project PX-100

Photo: Tyler Tyndell – Polaroid 1200 Cinema Film

Photo: Richard Kacprowski – Polaroid SLR 680 – Impossible Project PX-680 CP

Photo: Richard Kacprowski – Polaroid SLR 680 – Impossible Project PX-680 CP

Photo: Richard Kacprowski – Polaroid SLR 680 – Impossible Project PX-680 CP

Impossible 8×10 PQ – Burke & James Grover

Impossible 8×10 PQ – Burke & James Grover

Impossible 8×10 PQ – Toyo View

Impossible 8×10 PQ – Toyo View

Impossible 8×10 PQ – Burke & James Grover

Impossible 8×10 PQ – Burke & James Grover

Impossible 8×10 PQ – Toyo View

Impossible 8×10 PQ – Burke & James Grover
A couple of friends of mine, Daniel Poe & Matthew Hogan were there at this event and I did let them take over and rearrange the setup for their images. These guys are brilliant with off-camera flash and there was no way I was going to pass up an opportunity to watch them work. They quickly rearranged the octabox & stripboxes for their portraits and when I took the test images on the “digi-roid”, I knew they had crafted something nice …

Impossible 8×10 PQ – Burke & James Grover

Impossible 8×10 PQ – Burke & James Grover

Photo: Scott Mitchell – Polaroid 180 – Fuji FP-3000B

Photo: RJ Connole

Photo: RJ Connole

Photo: RJ Connole

Photo: Adriana Salazar – Impossible Project PX-70 CP

Photo: Amy Hirsch – Polaroid 250 – Fuji FP-3000B
Because I was in the studio all day, I never had the chance to go out and shoot with the rest of the group that was wandering around Deep Ellum. It was really cool to see all of the great images that flooded into my inbox on Sunday. Here’s a handful of images from the PolaWalk portion of this event …

Photo: Troy Bradford – Polaroid 600SE – Polaroid 669

Photo: Troy Bradford – Polaroid 600SE – Polaroid 669

Photo: Troy Bradford – Polaroid Spectra SE – Polaroid Softtone

Photo: Troy Bradford – Polaroid Spectra SE – Polaroid Softtone

Photo: Tyler Tyndell – Polaroid Spectra SE – 1200 Cinema

Photo: Adriana Salazar – Polaroid SX-70 – Impossible Project PX-70 CP

Photo: Adriana Salazar – Polaroid SX-70 – Impossible Project PX-70 CP

Photo: RJ Connole

Photo: Jama Plotts – Polaroid 250 – Fuji FP-100C

Photo: Jama Plotts – Polaroid 250 – Fuji FP-100C

Photo: Laidric Stevenson – Polaroid SLR 680 – Impossible Project PX-680 CP

Photo: CJ Mejia – Polaroid 220 – Fuji FP-100C

Photo: CJ Mejia – Polaroid 220 – Fuji FP-100C

Photo: Laidric Stevenson – Polaroid SLR 680 – Impossible Project PX-680 CP

Photo: Laidric Stevenson – Polaroid SLR 680 – Impossible Project PX-680 CP

Photo: Nancy Stockdale – Polaroid SX-70 – Polaroid Time Zero

Photo: Kyle Vaughn – Impossible Project PZ-680 CP

Photo: Kyle Vaughn – Impossible Project PX-680 Gold Frame

Photo: Amanda Potter – Polaroid Spectra – PZ-680 CP

Photo: Amanda Potter – Polaroid Spectra – PZ-680 CP

Photo: Amanda Potter – Polaroid Spectra – PZ-680 CP

Photo: Jeremy Hughes – Polaroid Spectra – PZ-680 CP

Photo: Jeremy Hughes – Polaroid Spectra – PZ-680 CP

Photo: Scott Mitchell – Polaroid 180 – Fuji FP-3000B

Photo: Kathy Tran – Fuji Instax Wide
I haven’t mentioned this on my blog yet, but I was interviewed last week by the local ABC news affiliate, WFAA – Channel 8, for a story they are doing on people who choose older forms of technology even when newer more advanced technologies are available. One of the reporters was with the group on Saturday to tape our PolaWalk and ended up interviewing a lot of the participants. After he recorded all of this great footage, Ryan came up to me and told me that they were probably going to do a separate story on our event in addition to the one I was going to be featured in. That’s exciting. It’s promotion for The Instant Film Society and more promotion for instant film in general.
I’m still a little stunned that we had around fifty photographers and instant film enthusiasts join us this past weekend. It’s a testament to the work we’ve been doing for months around the metroplex promoting instant film. On Sunday, when I created the new event page for our upcoming PolaWalk at Klyde Warren Park in February, within 24 hours, we had 30+ people who had signed up to join us. This special community of instant photographers is growing exponentially and I’m really excited to see how it will progress over the next year.
-Justin
http://www.instantfilmsociety.com
http://www.goodephotography.biz
My journey into the world of 8×10 Instant Photography
January 14, 2013 § 24 Comments
About a year ago, I was surfing the Craigslist photo ads here in Dallas and up came an ad for a free 8×10 view camera. I quickly emailed the person and within 15 minutes I received a message back. A gentlemen was moving out of town who had an old Burke & James Grover 8×10 that he had been meaning to restore & use but had never got around to it. He asked me if I was into large format and stated that he really wanted this camera to go to the right home. I enthusiastically conveyed to him that I was the right person and would eventually make my way up into the world of large format.

Burke & James Grover 8×10 View Camera
The Burke & James Grover is a utilitarian view camera that is meant to get the job done. It doesn’t have some of the bells & whistles that current 8×10’s have, but it works well, it’s pretty stable and for all intents and purposes, it was just what I had always wanted and needed.
When I arrived at the gentlemen’s home to pick it up, he had a few random camera accessories outside that he later told me was going to throw away on his porch. I looked at them in passing and then rang the door bell. When he greeted me, he was smiling while holding the Burke & James. This was the first time I had seen an 8×10 in person. It’s a pretty unique piece of equipment that’s been used for over a century in the world of photography. I can’t state just how excited I was to simply have the skeleton, if you will, of an 8×10. There was no lens, no 8×10 film holders, a busted lens board and frankly, the camera was pretty dusty. He stated that it had been in his garage for quite some time and he did not have the time to restore or use it. After about 20 minutes of photography small-talk, I thanked him emphatically for contacting me back. He chuckled and said “You know what? There were literally 15 to 20 emails about this 8×10 in 15 minutes. If you ever put “Free 8×10″ in an ad, you’d be surprised at how many respond to it.” I grinned a wide smile. “I bet.” I thanked him one last time and then made my exit.
I was on cloud nine. I had an 8×10. These things aren’t exactly cheap, and granted this thing isn’t the best 8×10 money can buy, but you know what? It was an 8×10 and more importantly, this 8×10 was going to get a lot of use … eventually.
When I got home and showed Synthia the newest acquisition, she was really shocked at the size of this thing and also a little nervous because she knows very well just how into things I can get. “How much is that thing going to cost to get up and running?” she said. “Ummmm .. well it’s not exactly going to be cheap. But, it’s not something I’m going to do tomorrow baby. It’s going to take some time to piece everything together that I’ll need for this.” This put her at ease a little bit and with the placement of the 8×10 on the top of a bookshelf, the notion of using this thing faded away.
A few months later, The Impossible Project announced that it was going to start making black & white 8×10 instant film. Whoa. At this point, I was shooting a lot of instant film and the dream of shooting instant film on 8×10 was just that .. a dream. There was no way I could get everything lined up to use this with instant film. It cost so much money and some of the required items needed (Polaroid 8×10 holder & the Polaroid 8×10 processor) were starting to go for astronomical prices on Ebay. On top of that, I didn’t have a lens and I still had a busted lens board. Oh well .. one day.
Months went by. My focus was on instant photography and eventually into promoting its use and helping others get into instant via the Instant Film Society. Some of you reading this might know that I’m a pretty persistent person and when I find things that truly strike a chord within me, I obsess over them and learn everything I can about it. That’s happened over the past 9 months with instant film and using Impossible’s film. I love it. In using and promoting this medium, I have come in contact with an amazing network of people that I would have otherwise never tapped into. I’ve met a slew of photographers, educators, enthusiasts and amateurs who all enjoy this form of art.
Slowly, things started falling into place. A friend of mine had some extra large format lenses laying around that weren’t getting any use, so I borrowed one of them and ordered a lens board on Ebay that fit the Burke & James. Also, maybe two months ago, I was buying film at Don’s Used Photo Equipment here in Dallas and on my way out, I noticed a Polaroid 8×10 Land Film Holder sitting on the shelf. I walked passed it and before I got to the door, I thought to myself “This is one of those serendipitous situations”. I walked back over to the 8×10 holder and asked the owner, Todd, what he was selling this for. He said “Man .. I have no idea. Make me an offer.” I gave him a number which he liked and then out of nowhere he said “You know .. I might have some Polaroid 8×10 in the back. Let me go see.” I started to get excited. About 5 minutes later he came back with an unmarked box and was smiling. “Let’s open this thing up and see what’s in it.” A pocket knife flipped open and within a few seconds 15 negatives & positives of Polaroid 809 revealed themselves. I asked him if it had been cold stored. It hadn’t, but I knew that he kept his place at a decent temperature for storage. After some debate and negotiating, we made a deal that I was very happy with. When I got back home, I was curious if the pods that held the developer paste had dried up in storage (always a risk with expired instant film). I opened up the cartridge that held the 15 positives and gently touched a pod. They were soft to the touch. The magical goop hadn’t hardened at all.
There was still one key thing needed; an 8×10 Polaroid processor. In order to develop Polaroid 8×10 film, you need a machine that runs the positive and negative side of the film through these giant rollers (either electronically or manually) to spread the developing paste in between them so the development process starts. Polaroid checked out of the instant market in 2008 and these machines hadn’t been made in years. Sure they are out there, but they are expensive. These processors are in high demand. When Impossible Project announced they were going to start making 8×10 instant film, the price of the processors skyrocketed during the following months, from under $100 on average to $500-1000+. Yikes. Not exactly cheap. When I got back home from Don’s, I started looking at instant images shot on 8×10 cameras and I stumbled upon a girl in town who had shot Impossible’s 8×10 test film. I messaged her up and told her about my interest in 8×10 and asked if she had access to a Polaroid processor. Annie was in school in Florida, and she did have a working processor, but wasn’t going to be back until Christmas.
Some time went by and I continually scoured the internet, looking for something that I could possibly pick up. Nothing. Everything was out of my budget and it seemed like the 8×10 instant photography dream would just have to wait. Then one day, while searching online, I found a guy in Kansas that was selling one. I emailed him, told him a little about myself and what I was doing here in Texas to promote instant film with the Instant Film Society. I asked if he would be interested in donating the processor so I could use it to help teach others about instant photography and help spread the love of instant. He messaged me back, told me that he wished that he could donate to such a worthy cause, but he really needed the money for it. Totally understandable. It was worth a shot. He did say however, that he was willing to work with me on it and would like to come to some sort of an agreement that was beneficial for both us. After some quick negotiating a happy medium was met and within a few days he shipped off the processor. I had him send it to my friend’s camera repair shop, just in case I wasn’t home to receive it, and when I got the call that it had arrived, I raced up there to go pick it up and test it out.
I ran inside and picked up the box. Uh oh. I could hear what sounded like small bits of plastic moving around. I opened up the box, which was packaged to perfection I might add, and pulled out the 8×10 Polaroid Processor. I flipped the cover open, turned some tabs and removed the rollers. Oh boy. Sitting before me were two rollers that were completely detached and busted from the roller assembly that holds them in place. This is not good. I called the gentlemen that I had purchased it from on the phone and within a few minutes we were discussing how this could have happened and what we were going to do. Well, at least I had a processor. Not a functional one at this moment, but I knew with a little bit of work, things would be OK. I called my friend Steve (who was introduced to me by Annie actually and also has an 8×10 processor) on the phone and he and I started brainstorming on what we could possibly do. He stated that I probably shouldn’t repackage it up and ship it back, because at this point, a) I had a processor b) I might be able to find a non-working processor to repair this one and have extra parts for later .. good point .. and c) maybe .. just maybe we could get some parts printed with a 3D printer or have them created from a mold made from parts out of his. Challenging but possible. I assume these processors haven’t had replacement parts made for them in YEARS. My options were limited.
After a little bit of time, it was looking like creating a 3D print was going to be the best place to start. Steve got in contact with some friends at Dallas Maker Space, an organization he’s involved with in town and started sharing some of the images of the broken part via email . The feedback he got was positive so we met on a Thursday night and enlisted the help from one of its members to create a 3D model and print. Mike was all about it. He jumped right to it, set up his 3D printer, a Maker Bot I believe and began taking measurements, creating a model on his computer and eventually, after about 4-5 hours of work, began printing the part that was needed. His level of expertise and knowledge were greatly appreciated. This sort of thing just doesn’t happen. Serendipity is a wonderful thing. Mike ended up working late in the evening on this, but after some time, he told us he needed to clean up the 3D model a little more. He worked on it over the weekend and suggested we have the part printed up professionally once the model was finished. At this point in time, I’m in limbo and hope that this works. *my fingers are crossed*
I had booked a shoot with Sarah Sellers that upcoming weekend and I can’t tell you how excited I was to finally shoot this stuff. Even with the shipping mishap, luckily Annie (who left to go back to school for the semester) left her processor with Steve & I so we could use it while she was away. If you’re reading this Annie .. THANK YOU AGAIN. I picked up the processor and knew I had to test out a shot or two before Sarah’s shoot. Friday rolled around and I decided to cruise up to my friend’s studio to test out an image (probably a good idea right?). I set up a handful of strobes with stripboxes and an octabox. I framed Synthia holding a camera, loaded the negative into the Polaroid 81-06 holder, double checked my focus with a loupe on the 8×10, slid the holder into place, removed the dark slide and tripped the shutter. I gently slid the darkslide back into the holder and removed it from the 8×10. Nervously, I placed a positive sheet (which has the developer pods at the top) into the 81-09 tray, slid the Polaroid negative holder into place and pressed the button. The processor grabbed the negative & the positive and smeared developer paste between the two as they whirred through the rollers. Now the longest four minute wait of my life …

Impossible Project 8×10 PQ Film – Burke & James Grover
Whoa …
I was practically jumping up and down freaking out! I was in awe of just how incredible this looked! After my excitement wore off (really it never did) I messaged Sarah up telling her how excited and anxious I was about her shoot. It was going to be, for lack of a better word, epic. Epic beyond belief. 8×10 …
Saturday rolled around and my brother Josh, who’s worked extensively with Sarah over the past year producing new songs with her with his engineering parter Brad, opened up the music studio they work out of and we shot a handful of images there. For all of these images, I used a three light setup with Alien Bees. If you’re interested in heavy technical details I can give them to you. Just send a message my way to info@goodephotography.biz and I’ll be happy to pass the info along.
I shot 3 images in 3 hours and frankly, I don’t ever want to create images in any other form or fashion again. I feel that using this 8×10 camera has spoiled me. There’s absolutely nothing like large format photography. I’m hooked …
Impossible Project 8×10 PQ Film – Burke & James Grover

Photo: Synthia Goode – 9/11 EXPIRED PZ680

Impossible Project 8×10 PQ Film – Burke & James Grover
Impossible Project 8×10 PQ Film – Burke & James Grover
Following Saturday’s shoot, we met back up on Sunday at a photography studio in Richardson to shoot some more material. This time around I wanted to capture a really good close-up of Sarah, a full length shot and of course anything else that came to mind. When she arrived, I set up a beauty dish and a couple of strip boxes and set the 8×10 up.

Photo: Synthia Goode – 9/11 EXPIRED PZ680
This time around, because of how close I had to focus, the bellows was extended waaaaay out. I think the bellows extension factor ended up being about a stop and a half if not a little more (thanks for the tip Mat Marrash). Nervously, I slipped the holder into place, held my breath, hoped that Sarah hadn’t rocked too far back or forward and tripped the shutter.

Impossible Project 8×10 PQ Film – Burke & James Grover
Sweet! Another successful image. Phew! Shooting this stuff isn’t exactly easy and it definitely makes you think about everything .. i mean EVERYTHING when shooting each image. It’s just a little bit stressful, but I’m OK with that. I set up the lights for a full length shot and Sarah got changed into another outfit. Admittedly, the first image I took in this scene was about a stop under-exposed (I had a hunch but didn’t listen to myself .. I’ll listen next time). I loaded up another image and tried one more time. Bam.

Impossible Project 8×10 PQ Film – Burke & James Grover
By this time, we had probably spent a good 2-3 hours in the studio setting up lights and arranging things so they were just right. Out of all the images taken, I had yet to take an image outdoors. Synthia had a great idea and asked what it would look like if Sarah held the close up we had taken earlier in front of her face for an image. Brilliant. I am a fan of picture in picture images. Why not take a picture in picture with Impossible’s 8×10 PQ?
We set up outdoors in the alleyway (it was so cold!) and I snapped this image of Sarah ..

Impossible Project 8×10 PQ Film – Burke & James Grover
It was getting close to sunset, so we decided to take a break and would meet back up in an hour to take another image. For this image, which ended up being the final one of the day, I wanted to shoot a silhouette of Sarah’s profile using a two light setup. I set up a speedlight behind her with a reflector around it to create a circular shape on the wall and then set up a strobe with a stripbox to shine a little bit of light on her face. Once it was metered out and she was in the right position, you guessed it, I did the 8×10 Polaroid shuffle and waited with Sarah as the image developed.
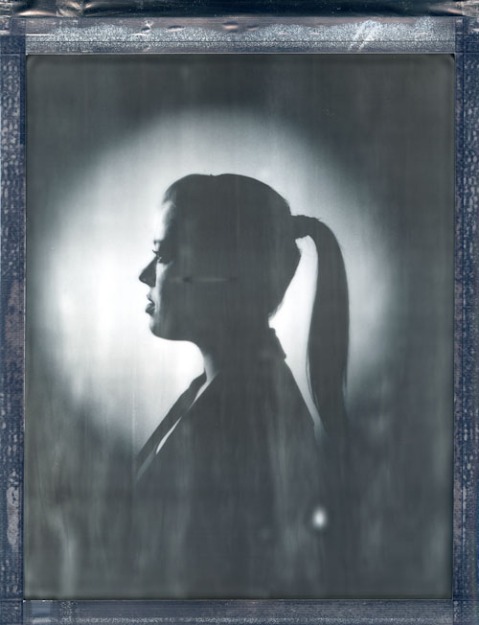
Impossible Project 8×10 PQ Film – Burke & James Grover
My thoughts on this film? Challenging, elegant and unforgiving. There are so many variables that you have to think of and be aware of when shooting 8×10 instant film. It really tests your skills. This stuff isn’t child’s play. I can’t stress enough just how stressful it can be to shoot, but are the results worth it? Absolutely. The experience of shooting Impossible’s 8×10 instant film are unlike any other that you will have. It creates a special bond between the photographer and the person being shot. You know that all of the work put into each image will create something unique .. something beautiful. When you shoot 8×10 instant film, you’re not just creating a photograph .. you’re creating a tangible, analog work of art.
What’s next in my journey with 8×10? Sharing this experience with others. On January 26th, I’m hosting a PolaWalk in Dallas, TX with the Instant Film Society. If you’re in the area and would like to witness this process in action, you’re more than welcome to join us. We’ll be shooting 8×10 instant images of the participants of the walk at the cost of film (hopefully we’ll have enough). If you’d like more information, click here.
Thank you Impossible for bringing back this legendary film format. Keep doing what you’re doing …
PS – Sarah Sellers, thank you for trusting me to shoot these images with you. Synthia and I had such a great time. It was a weekend we will NEVER forget.
-Justin Goode
A PolaWalk in Sundance Square
December 18, 2012 § Leave a comment
This past Saturday, the Instant Film Society was at it again storming the streets with our Polaroids in hand. I’ve started to organize monthly meet ups around the D/FW area to help promote and encourage the use of instant film. While doing so, I’ve met an incredible amount of talented and passionate people that enjoy instant photography. Besides the ones that were already into it, I’ve helped a lot of my friends get their feet wet and most if not all, LOVE it. The tangible instant gratification is something that I think appeals to everyone that tries it out.
The weather on the day of was perfect. You really couldn’t have asked for better weather. It was slightly overcast and 70 degrees … in December. You’ve got to love Texas. Anyhow, I cruised out to Ft. Worth with my friend Jama and we ended up making it out there a little early. Made our way over to the The Flying Saucer (the meet up spot) and I saw Troy B. making his way towards us. I’ve interacted with Troy online quite a few times, but this was the first time he was able to attend one of these events with us. Long story short, he’s a super nice guy and his presence was definitely a bonus. We instantly started gabbing all things photography and clicked off the bat. By this time, Annie, another person I’d met online, showed up and you could tell that she was happy to be there amongst like-minded peeps. Come to think of it, most of the people that came to this particular walk were new to the group and had not been to a previous one. For me, that’s really encouraging. It means that this positive vibe I’m throwing out there, into the world about instant photography, is working. I truly believe the world reciprocates positivity when you give it the same. That seems to be happening with the Instant Film Society. I couldn’t be happier.
We waited around for the rest of the group to show up while talking shop with each other. Richard, who was at our first event, joined up with us and I’m so glad he came back. His energy is palpable and he’s so much fun to be around. My good friend Justin V. (JV) and his son Callum showed up .. which was awesome. Amanda P., this super nice girl I’d met online who’s working on a long term photo project (Impossibly Expired) came to the walk too and ended up loaning Callum a SX-70 and a pack of film to shoot with! Anyhow, JV later said that seeing Callum’s eyes at that moment was the highlight of his night. 🙂 RJ, a fellow film lover that I had met online was there. Amy, my good friend that has dove head first into Polaroid cruised out too. Laidric, one of the now regulars in our group came out again. He’s always fun to hang around with. Jessica H., a girl that knows one of my best friends, showed up with one of her friends (I forgot your name .. sorry!) Annie, whom I mentioned earlier, got me in touch with two photographers, Steve & Erin, who are into vintage cameras a few weeks ago and they of course showed up too! Last but certainly not least, Christian, Elaine and a group of their family/friends met up with us as well. Christian is a big promoter of instant film around his neck of the woods and has been to every event we’ve had. I just can’t say enough just how cool all of these people are and how much I enjoy their company. Alright, enough with the role call …
This walk, was mainly geared towards shooting instant film at night and shooting long exposures. We had about an hour of light before the sun set when we began. As things got darker, most used tripods to help steady their exposures during this PolaWalk. One of the things I love about photography and also hosting these events, is that I get to see and share unique perspectives from a variety of instant photographers. From beginners to professionals, each have their own approach in how they see and capture the subject which is reflected in these images.
Enjoy a healthy mix of Impossible Project, expired Polaroid, and Fuji peel-apart images …

Photo: Troy Bradford – Polaroid Spectra – Impossible Project PZ600 Black Frame

Photo: Jama Plotts – Polaroid One Step – Impossible Project PX-680 CP

Photo: Annie Donovan – Polaroid Spectra – Impossible Project PZ600

Photo: Amanda Potter – Polaroid SX-70 – Impossible Project PX-70 CP

Photo: Erin Curry – Polaroid SX-70 Sonar – Impossible Project PX-100 Old Gen

Photo: Amy Hirsch – Polaroid 250 – Fuji FP-100C

Photo: Jama Plotts – Polaroid One Step – Impossible Project PX-680 CP

Photo: Justin Goode – Polaroid SX-70 – Impossible Project PX-70 COOL

Photo: Justin Goode – Polaroid SX-70 – Impossible Project PX-70 COOL

Photo: Justin Goode – Polaroid Sonar SX-70 – Impossible Project PX-70 COOL

Photo: Troy Bradford – Polaroid Land Camera – Polaroid 690

Photo: Troy Bradford – Polaroid Land Camera – Polaroid 690

Photo: Troy Bradford – Polaroid SX-70 – Imposible Project PX-70

Photo: Amanda Potter – Polaroid SX-70 – Impossible Project PX-70 CP

Photo: Amanda Potter – Polaroid SX-70 – Impossible Project PX-70 CP

Photo: Steve Reeves – Polaroid 600SE – Fuji FP-100C

Photo: Erin Curry – Polaroid SX-70 Sonar – Impossible Project PX-100 Old Gen

Photo: Amy Hirsch – Polaroid 250 – Fuji FP-100C

Photo: Annie Donovan – Polaroid Spectra – Impossible Project PZ600

Photo: Annie Donovan – Polaroid Spectra – Impossible Project PZ600

Photo: Annie Donovan – Polaroid Spectra – Impossible Project PZ600

Photo: Amy Hirsch – Polaroid 250 – Fuji FP-100C

Photo: Callum Vinson – Polaroid Rainbow SX-70 – EXPIRED PX-70

Photo: Jama Plotts – Polaroid One Step – Impossible Project PX-680 CP

Photo: Elaine Rios – Polaroid SX-70 – Impossible Project PX-70 CP

Photo: Elaine Rios Polaroid SX-70 – Impossible Project PX-70 CP

Photo: Justin Vinson – Polaroid Spectra – Impossible Project PZ680 CP

Photo: Christian Oliveira – Polaroid Alpha SX-70 – Impossible Project PX-680 CP + ND

Photo: Christian Oliveira – Polaroid Alpha SX-70 – Impossible Project PX-680 CP + ND

Photo: Christian Oliveira – Polaroid Alpha SX-70 – Impossible Project PX-680 CP + ND

Photo: Laidric Stevenson – Polaroid Spectra Pro – Impossible Project PZ680 CP

Photo: Laidric Stevenson – Polaroid Spectra Pro – Impossible Project PZ680 CP

Photo: Jama Plotts – Polaroid Spectra – Impossible Project PZ680 CP

Photo: Laidric Stevenson – Polaroid Spectra Pro – Impossible Project PZ680 CP

Photo: Justin Vinson – Polaroid Spectra – Impossible Project PZ680 CP

Photo: Justin Goode – Polaroid SX-70 – Impossible Project PX-70 COOL

Photo: Justin Goode – Polaroid SX-70 – Impossible Project PX-70 COOL

Photo: Justin Goode – Polaroid SX-70 – Impossible Project PX-70 COOL
At the end of the night, a group of us met back up at The Flying Saucer and grabbed a few beers while talking about all things photography. Steve set up his Polaroid 600SE and snapped a couple of long exposures on his Polaroid using Fuji’s FP-100C. The following exposures were set up from the area we were hanging out at, exposed for 30 minutes due to the reciprocity failure of the film and were, as Steve said, “fueled by a Left Hand Milk Stout” 🙂

Photo: Steve Reeves – Polaroid 600SE – Fuji FP-100C

Photo: Steve Reeves – Polaroid 600SE – Fuji FP-100C
Are you interested in joining us for our next PolaWalk? We’ll be shooting around Deep Ellum in Dallas, TX on January 26th. If you’d like more info, you can find it here.
Twitter user? Follow us: @UseInstantFilm
As always, thanks for reading.
-Justin
Getting into Instant Photography
December 3, 2012 § 6 Comments
So you’re interested in learning more about this whole instant photography thing? I know the feeling. I can go on and on about why I love it, but I’d rather take this time to tell about some of the options that are available.

– A variety of cameras that shoot instant film –
As you may or may not know, there are two companies manufacturing analog instant film that market their products world-wide; FujiFilm in Japan and The Impossible Project in the Netherlands.
Fuji makes a couple of types of instant: integral film for their Instax camera line (the Instax mini & Instax wide) and peel-apart film for Polaroid pack film cameras. The Instax system is a great entry-level start into the world of instant. If you’re looking to capture candid images at a club, a party, hanging out with friends, this is a ideal choice. It fires a flash every time and takes good images. Food for thought: If you really get into instant, you might find that that this camera system is restricted when compared against others in the field. However, it’s all in how you use it. I’ve seen some incredible work produced from professionals who shoot with Instax cameras.

Photo: Daniel Rodrigue – Fuji Instax Mini

Photo: Daniel Rodrigue – Fuji Instax 210

Photo: Mark Goode – Fuji Instax 210

Photo: Mark Goode – Fuji Instax 210
Fuji’s peel-apart film, FP-100C (color) & FP-3000B (B&W), is used in 100 series Polaroids, cameras which use a NPC Polaroid back or ones that have been converted to use pack film (Polaroid 110A & Polaroid 110B’s come to mind). Pack-film Polaroid cameras are a lot of fun to use. You can find them for $10-50 (on average) for the cameras with automatic exposure and for the models with manual exposure settings you’ll spend $300+ (Polaroid 180, 185, 190, 195, 600SE, Fuji FP-1). When looking for one, inspect to make sure there are no light leaks in the bellows. Use a flashlight to shine around in the camera when the back is open and look on the outside of the bellows for leaks. Check to make sure the rollers move freely and are fairly clean (wipe them down with a damp paper towel to remove any gunk you might find). Also, the required battery needed to run the meter is a little hard to find. Most people I’ve found covert the camera to use either AA or AAA batteries. It’s really simple. This a great tutorial on how to do it. Just be mindful of whether you need to convert to 3V or 4.5V which is easily determined by looking at the underside of the battery compartment door. But don’t let this technical mumbo-jumbo fool you. Once you get your camera in operating condition, the fun you’ll have with it is endless.
Fuji’s peel-apart film has a very clean look to it. The colors are pleasantly saturated, and the detail & clarity is very good.

Fuji FP-100C – Polaroid Automatic 100

Fuji FP-100C – Polaroid Automatic 100

Fuji FP-100C – Polaroid Automatic 100

Fuji FP-100C – Polaroid Automatic 100

Photo: Daniel Rodrigue – Polaroid 180 – Fuji FP-3000B
Each exposure, when peeled, has a positive print and a negative. Further adding to the enjoyment of it, when shooting color film, the FP-100C negative can be salvaged to scan by bleaching the negative.
As I mentioned earlier, you can use any camera that has a NPC Polaroid back with peel-apart as well. I use a RB67 + a NPC Polaroid back and get great results. Note the black unexposed portion of the frame when shooting with a RB67.

Mamiya RB67 + NPC Polaroid Back – Fuji FP-100C

Mamiya RB67 + NPC Polaroid Back – Fuji FP-100B
You might be thinking .. What about all of those other Polaroids cameras? Do they still make film for those?? Luckily, since The Impossible Project stepped into the game, they do! They’ve re-invented integral film for literally hundreds of thousands of Polaroids that are still out there. Any of the Polaroid 600 series, Spectra/Image or SX-70 cameras can still be used. Beyond that, they’ve brought 8×10 instant film back into the marketplace.
A good Polaroid to start off with that shoots integral film would be any of the Polaroid One Steps/600 series cameras. You know the ones; boxy, most flipped open and have a flash. Nearly every office in the 80’s & 90’s had one for employee photos. They are fairly easy to use and shoot color (PX-680) or B&W (PX-600) film. There are a large variety of 600 series cameras available. If you’re purchasing on Ebay or Craiglist, you’ll find One Steps from $10-$100+ on average depending on the model and if it’s a collectible. The camera has two focusing distances (2-4ft and 4ft – infinity) and takes good images.

Photo: Patrick Clarke – Polaroid One 600 – Impossible Project PX-600

Photo: Laidric Stevenson – Polaroid Sun 660 – Impossible Project PX-680 CP

Photo: Annie Donovan – Polaroid One 600 – Impossible Project PX-70 NIGO

Photo: John Morrison – Polaroid One Step – Impossible Project PX-680 COOL
Polaroid Spectra cameras are another great option and are pretty durable cameras too. If you’re going to be roughing it while out and about, this particular camera is perfect for the job. I’ve been using these for a while and they produce really nice results. Most of the Spectra cameras I’ve picked up have been $10-20. They use color (PZ680) or B&W (PZ600) Impossible Project film, use inaudible sound waves to aid in auto-focusing and are pretty user friendly. I took one to a Texas Rangers game at the Ballpark in Arlington this past summer. If you’re interested in reading a little more about the camera & how it works, you can find that here.

Photo: Synthia Goode – Polaroid Spectra – Impossible Project PZ-600

Polaroid Spectra AF – Impossible Project PZ-680

Polaroid Spectra AF – Impossible Project PZ-680
This brings me to Polaroid SX-70’s. These are some of my favorite Polaroid cameras to use. They are really fun to operate. Unlike all of the other cameras as fore mentioned, because this particular camera is a SLR, what you see in the viewfinder is what you get. The Sonar SX-70, like the Spectra, also uses inaudible sound waves to measure the subject’s distance from the camera. If you get lucky, you can find these for around $20. But most of the various SX-70 models go anywhere from $40-100 depending on its condition and whether it’s been serviced/refurbished etc. Using SX-70’s with Impossible film can be a little challenging, however once you get over the learning curve and get a handle on how to best utilize their films with this camera, it produces some awesome results.

Polaroid SX-70 Sonar – Impossible Project PZ-600 + ND4 Filter

Polaroid SX-70 Sonar – Impossible Project PX-70 COOL

Polaroid SX-70 Sonar – Impossible Project PX-70 NIGO Edition

Polaroid SX-70 Sonar – Impossible Project PX-70 CP

Polaroid SX-70 Sonar – Impossible Project PX-70 CP

Polaroid SX-70 Sonar – Impossible Project PX-70 COOL
Last, but certainly not least, is the Polaroid SLR680/SLR690. These are top of the line Polaroids that shoot 600 speed film (PX-680 or PX-600). I’ve seen these online anywhere from $75-$200+, again, depending on the typical used-camera variables. They are modeled after the SX-70. Their rollers spread the film a little more even, it has more focusing zones than the Sonar SX-70 and they come equipped with a flash that can be toggled on/off.
When looking for a used camera, of course look for signs of damage, but even more so, check the lens to make sure it’s clean. Inspect the rollers; they should move somewhat freely. If you bring an empty film pack with you, you can check to make sure the camera’s ejection mechanism is working (this is not needed on Polaroids which use peel-apart film). Simply slide a darkslide into the empty pack, put it into the camera and if everything functioning properly, when you close the film door, the darkslide should eject out. Some cameras might sound slow or sluggish if they haven’t been used in a while. Actuate the shutter a handful of times. It will help move the gears and get the juices flowing. If you’re in the D/FW area, I have a few empty packs laying around. I’ll mail you one if you’re in need.
A big thanks to Daniel Rodrigue, Mark Goode, Patrick Clarke, Annie Donovan, Laidric Stevenson, John Morrison & Synthia Goode for letting me use their images to fill out this blog post. It is appreciated!
If you’d like to know more, send a message my way. I’d be happy to help you in any way that I can. Email me at info@instantfilmsociety.com
-Justin
A PolaWalk at the Ft. Worth Zoo
November 12, 2012 § 10 Comments
The meet-up at the fair was the inaugural event for the Instant Film Society, an organization I’m helping start that promotes the use, accessibility and education of analog instant photography. Following the success of the State Fair PolaWalk, we were all anxious to hook up again for another. The next event was scheduled for November 10th. The weather up ended being gorgeous and the turnout was phenomenal.

Photo: Daniel Rodrigue – Polaroid Spectra SE – Polaroid Softtone Film
On the day of, I packed a Polaroid Sonar SX-70, a SLR680 and a handful of packs of Impossible Project PX-70 COOL & PX-680 CP. Synthia had her trusty Spectra AF with some Polaroid Softtone film. We threw in a couple more Polaroid cameras for some friends to borrow, hopped in the car and made our way over to Ft. Worth.
The evening before I had been contacted by one of my cousins, Luke. To my surprise, he told me his family was going to join us at the zoo and needed to know where he could pick up some film. I mentioned I had a One Step he could borrow and directed him to Urban Outfitters. He ended picking up a pack of Impossible’s Rainbow Frame film. Another friend of ours, Amy, joined as well. She had been keeping up with the blog and was interested in learning more about The Impossible Project and instant film in general. In fact, they weren’t the only ones who were new to the walk. While promoting this event, I got connected with a few other photographers online who came and a large group from Brookhaven met up too. We had more than 20 people there. It’s really cool that we all met up for the love of instant film.
After we arrived and hooked up with everybody, we started making our way around the zoo. The images shot were a mix of Impossible Project, expired Polaroid and Fuji instant film. Enjoy the pics!

Photo: Luke Bolton – Impossible Project PX-680 Color Block – Polaroid OneStep

Photo: Laidric Stevenson – Impossible Project PX-680 CP – Polaroid Sun 660

Photo: Ashley Sierra – Impossible Project PX-680 COOL – Polaroid Cool Cam

Photo: Amanda Fleetwood – Polaroid 420 Land Camera – Fuji FP-100C

Photo: Synthia Goode – Spectra AF – Impossible Project PZ680 Old Gen

Photo: Laidric Stevenson – Impossible Project PX-680 COOL – Polaroid Sun 660

Photo: Ashley Sierra – Impossible Project PX-680 COOL – Polaroid Cool Cam

Photo: Kathy Tran – Impossible Project PX680 CP – Polaroid 600 One Step

Photo: Marc Weintraub – Bronica SQ-A – FujiFilm FP-100C

Photo: Luke Bolton – Impossible Project PX-680 Color Block – Polaroid OneStep

Photo: Justin Goode – Impossible Project PX-680 CP – Polaroid SLR680

Photo: Luke Bolton – Impossible Project PX-680 Color Block – Polaroid OneStep

Photo: Catherine Downes – Polaroid OneStep – Impossible Project PX-680 Color Block

Photo: Justin Goode – Impossible Project PX-680 CP – Polaroid SLR680

Photo: Catherine Downes – Polaroid OneStep – Impossible Project PX-680 Color Block

Photo: Justin Goode – Impossible Project PX-680 CP – Polaroid SLR680

Photo: Marc Weintraub – Bronica SQ-A – FujiFilm FP-100C

Photo: Amy Hirsch – Polaroid 100 Land Camera – Fuji FP-100C

Photo: Amy Hirsch – Polaroid 100 Land Camera – Fuji FP-100C

Photo: Ashley Sierra – Impossible Project PX-680 COOL – Polaroid Cool Cam

Photo: Laidric Stevenson – Impossible Project PX-680 CP – Polaroid Sun 660

Photo: Daniel Rodrigue – Polaroid Spectra SE – Polaroid Softtone Film

Photo: Justin Goode – Impossible Project PX-70 COOL – Polaroid Sonar SX-70

Photo: Scott Mitchell – Polaroid 180 Land Camera – Fuji FP-100C

Photo: Daniel Rodrigue – Polaroid 180 Land Camera – Fuji FP-100C

Photo: Scott Mitchell – Polaroid 180 Land Camera – Fuji FP-100C

Photo: Laidric Stevenson – Fuji Instax Wide

Photo: Marc Weintraub – Bronica SQ-A – FujiFilm FP-100C

Photo: Marc Weintraub – Bronica SQ-A – FujiFilm FP-100C

Photo: Christian Oliveira – Impossible Project PX-70 CP – Polaroid SX-70

Photo: Scott Mitchell – Polaroid Spectra – Polaroid Softtone Film

Photo: Adriana Salazar – Impossible Project PX680 – Polaroid 600 One Step
Some of the group has wandered off at this point and had gone their own way. We regrouped as many of us as we could and snapped a quick shot about halfway through the afternoon.

PolaWalk at the Ft. Worth Zoo – Polaroid Spectra AF – Polaroid Softtone Film

Photo: Synthia Goode – Polaroid Softtone film – Polaroid Spectra AF

Photo: Christian Oliveira – Impossible Project PX-70 CP – Polaroid SX-70

Photo: Amanda Fleetwood – Polaroid 420 Land Camera – Fuji FP-100C

Photo: Laidric Stevenson – Impossible Project PX-680 CP – Polaroid Sun 660

Photo: Kathy Tran – Impossible Project PX680 CP – Polaroid 600 One Step

Photo: Justin Goode – Impossible Project PX-70 COOL – Polaroid Sonar SX-70

Photo: Justin Goode – Impossible Project PX-70 COOL – Polaroid Sonar SX-70

Photo: Catherine Downes – Polaroid OneStep – Impossible Project PX-680 Color Block

Photo: Laidric Stevenson – Fuji Instax Wide
Throughout the day, we were approached by strangers inquiring about the event and just what all this was about. Everyone was thrilled that you could still buy instant film, smiled at the sight of the cameras and were glad to know that it was still being produced. We passed out handfuls of flyers & stickers from Impossible and helped spread the word about all things instant.
The next day I talked with many of the people that joined up with us. Everyone loved the event and most were already talking about the next. I could feel the energy & excitement. One in particular said she spent her Sunday afternoon obsessively looking on Ebay for Polaroid cameras and felt as if somehow she was supposed to stumble upon this hobby. That’s what this is all about for me. Spreading the love of instant photography to others and inspiring more people to reach out and try it. Once you shoot it and feel it .. it’s really hard not to love it.
Want to learn more? Come to our next PolaWalk on December 15th in Sundance Square. You can find details here.
-Justin
Review: Impossible’s LIFT IT Brush Set
October 22, 2012 § Leave a comment
I’ve recently started using Impossible’s LIFT IT! brush set for emulsion transfers. Included in the set are four brushes, varying in size, which aide in the removal, positioning & manipulation of the gelatinous emulsion during transfers. In the past, I was using regular watercolor brushes to remove the emulsion from the mylar surface of instant images. That had been working OK, but since I’ve gotten these, I’m never turning back …

Impossible Project’s LIFT IT Brush Set
I’ve heard, “Aren’t these the same as brushes that I can pick up at Michael’s or Hobby Lobby?” At first, I assumed they might be. Not quite the case. When I would use other brushes, the bristles would flare out and I’d end up using the base of the bristles to push off & remove the emulsion. Sometimes I would end up tearing the emulsion while I was removing it, because invariably I was using the metal/wood portion at the base of the bristles. The LIFT IT brushes are designed well. The brushes that need to stay ridged and/or soft deliver. The #1 brush for instance, stays ridged while you use the soft bristles of the brush to remove the emulsion. This helps the user remove it without the heightened risk of tearing it. When you’re dealing with a gelatinous material, being as careful as you can is key.
Since I’ve started using the LIFT IT kit, I’ve made a handful of transfers for family & friends. I made a couple more this evening for this blog post to walk you through the steps. The steps might vary from person to person. This is one of the methods I use. I used three images to make two emulsion transfers. One will be dried & stowed away in the “another random transfer” file & the other will end up being a card for my grandmother.

Images for emulsion transfers

Using a sharp knife, splice the edges of the film …

Run the knife around all four sides …

Run the knife around all four sides …

Keep going ..

Carefully peel back the layers …

Discard the bottom portion …

I repeated the process on the remaining two images …

The three peeled images

Pour hot water into a tray/bowl

I submerged the three images …
Brush #3 was made to shape, distort and to remove contortions after the transfer, however, I found that it also served well as a tool to wipe away the developer residue from the backside of the emulsion. The brush is super soft and the fine bristles worked really well at this task.

Using brush #3, I gently wiped the developer residue away

Using brush #3, I gently wiped the developer residue away

Using brush #3, I gently wiped the developer residue away

Using brush #1, I began removing the emulsions from the mylar

Using brush #1, I began removing the emulsions from the mylar

I gently moved the emulsions into a tray/bowl of cold water

Once all three emulsions were in the cold tray …

I slid a piece of card stock under one of the emulsions

I then placed another emulsion on top of the other to help frame it

Once I had maneuvered it around to my liking …

I gently slid a brush under the middle and lifted it out of the water
At this point, I used brush #4 to brush away some of the creases. After a little bit of brushing the creases grew on me; I decided to leave it alone and let it dry.

For the last emulsion, I slid a card into the water …

Moved the emulsion on top of the submerged paper ..

Positioned it how I liked it using brush #1 & #2 and gently removed it
Positioning these onto paper can be a little difficult. It’s best to use small delicate motions with the brushes to move it around. Once the emulsion is spread out, I’ve found you can position the paper underneath, and use gentle side-to-side motions to carefully make water movement push the image around. It takes a little bit of practice. Once I get the image where I want it, I slide a brush underneath the paper and gently push up from the middle to bring it out of the water.

Using brush #4, I added some tears around the edges

Using brush #4, I added some tears around the edges

Using brush #4, I added some tears around the edges
About halfway through this process, brush #4 was a little gunked up with the gelatinous goo. Nothing a quick dip in cold water couldn’t fix; it was as good as new.
When I was finished transferring the emulsions, I used the soap provided in the LIFT IT kit and thoroughly cleaned the bristles. They were clean within a matter of seconds and I set them aside to dry.
– The Transfers –

Example #1

Example #2
Should you buy it? Of course. Why? For a couple of reasons .. the main one is they really do work well and if cared for properly, these brushes should last you many, many, many transfers (years!). #2 – Do I really have to say it? You’ll be supporting one of the only instant photography companies by purchasing it. Buying their products empowers them to keep providing us with great analog materials to create art. It’s a no brainer!
Help keep instant alive!
If you have ANY questions whatsoever, please send a message my way. I’m always happy to help in any way that I can.
Thanks for your time!
-Justin
The “Out of the Blue” exhibit at the Impossible Project NY Gallery Space
October 17, 2012 § Leave a comment
Thursday October 25th, the “Out of the Blue” exhibit is opening at the Impossible Project New York gallery space! I was chosen, along with 29 other talented photographers, to display our images celebrating what’s become possible with Impossible’s newest films. I’m grateful and honored to have been selected with the likes of such creative individuals!
If you are in the New York area, please stop by and check it out. Not just for the unique images on display, but also to meet the incredible people that work there. The exhibit will be up for roughly 3 months, until Jan 31st, so you’ve got plenty of time!
– CLICK ON FLYER FOR DETAILS –

Out of the Blue Exhibit – Impossible Project New York
As always, thank you for reading my blog!
– Justin Goode
CLICK HERE for more information about the Impossible Project New York Gallery Space
